Saturday, January 30, 2010

Mystery revealed

Finally! After a long week, I give you the answers for your question: "what the heck did she do for the sewing circle anyway?"

Here it is:


A paper piecing of the Eiffel Tower!

I was going to choose completely different fabrics for that, but my dear teacher gave me those - isn't she adorable? It's basically the same color choice the book I used suggests, and I thought of changing them. But I guess it turned out really good using plain colors for the tower.

So, following the sewing circle ideas, it started somewhat like this: I tried to gather a group of girls at work to join the circle. Yes, I do everything to bring more people to our crafty world. None of them seemed to be very interested, and when the date arrived, I was swamped in things to do for work, and evil people were all around - so I thought I wouldn't bring doom to myself SEWING DURING LUNCH. Imagine the nerve of being happy at the office. Nonsense.


Which made me work till late then going to my sewing supplies around 10 pm on January 13th. And the idea was to use the blog name as an inspiration - "I've been thinking of you". And then it hit me: the Eiffel Tower paper piecing! I've been to Paris last year, and I've always loved that city, don't know why. After my trip I certainly know why - it's gorgeous, to say the least. And since then I have images of the city popping in my head out of nowhere. It always makes me smile. I bought the book "365 Foundation Quilt Blocks" by Linda Causee a little while before visiting Paris, and when I saw that block I decided it would make a beautiful bag. So there I went to start my sewing circle project!


It was late and I was tired, but it felt so good to take that moment and be part of something like this. I knew that someone might be sewing a project at the same time, and it's good to feel connected through something we love, isn't it?


It was a LOT of work, I assure you.

Katherine asked us to fill some info about the project, here it is:
Wait, there's more:


Feel your surroundings: I was home, in my living/dining room. The house was quiet, the husband was in the computer, on the back of the apartment, it was late at night, so the noises were diminished. Just me and the aquarium close by, with a soothing sound of water running.
LOOK
left: the wall with a pretty painting of white flowers in a window
right: the corridor, with light coming from the room where my husband was using the computer (that darn Facebook Farm Ville...)
in front: my dining room table - and actually the whole living room (not very big apartment)
behind: my kitchen, lights off.
at your feet: my nice and light wooden floor.
above your head: just my ceiling, with bright lights.
Close your eyes what do you SMELL? - Home. And fabric. Bliss.
What can you TASTE? - Nothing, I guess.
Shut your eyes, breathe deeply and LISTEN carefully. - I have to admit it, I actually did what the sentence says. I could listen the aquarium water running, cars on the street, computer keys and mouse buttons, the pencil marking the design and then my scissors cutting the foundation fabric.

Although I have the bad habit of trying things beyond my current skills with a DUE DATE - don't do that to yourself! - I have to say: no matter how hard it was this foundation, I am so happy with the result. Now I have to pick a fabric to make the bag and find some nice text font to embroider "Paris" above the foundation. And of course, I'll try to make the embroidery in some kind of technique that I don't know yet. But I won't have a due date this time!

Thank you, Katherine, for the incentive!

P.S.: Did you like the project I chose? Sorry for turning it into a mystery... after all, the last post was full of hints, wasn't it?

Saturday, January 23, 2010

Slow and constant movement

This week was another one with strong external elements negatively influencing my craft activities. Translating: working too much for others, and almost no fun. The first part I unfortunately can only comment in the presence of my lawyer, but the second one I can talk about at will.

Please note, it wouldn't be possible for me to be here writing this post if I haven't done absolutely no craft this week. Simply because I would be so weak that I wouldn't be able to use the computer! (believe me, that already happened!) Lack of craft is my kryptonite.

Which means that - oh joy! - we have pretty things to show! BUT... sorry about that, I won't. Simply because I've been working every night in the sewing circle project and I'll only show it when it's done!! Please, don't panic. I can only say two things:

1. I have the bad habit of picking things far beyond my current skills;
2. despite the (many) difficulties, it's turning out beautiful! (putting modesty aside)

(I'm using a lot of exclamation marks today!!!)

To compensate the mystery, I'll show other things - hold on to your chair! (another exclamation mark?? what's happening??)


Thanks to Crafty Frugals, I remembered that cooking is a craft that I try very little - much less that I'd like to. My mom is wonderful in the kitchen (and, thinking about it, in crafts in general - think about unattainable goals). I, on the other hand, don't have much talent - maybe if some day I have time to invest in this art I end up awakening some chef gene and turn myself into the next Jamie Oliver (I would never be like Nigella, licking my fingers and putting them back into the pan. Imagine that.). This picture was taken out of pure pride: I've cooked tomatoes stuffed with ricotta, corn and some other little things. I thought it was great. Being the only one to taste it doesn't influence the results.


The picture didn't turn out good, but look at my little one! It took me a long time to pick my first sewing machine, months of research and budget adjustments - and then a long season of husband persuasion (you don't want to know what he said about my machine). This story's worth another post, but it's been such a long time since I got to play with it that I thought she deserved to show up in the Garden.

Yes, the secret-project is being sewn by hand. Stop asking, I'm not telling what it is.


Do you know what they are? No, no potholder. I'll decorate the kitchen with them - actually, one at a time. The tulip was my first work in Foundation (or Paper piecing). It's a patchwork technique, but it uses a base - the pattern - where you sew tiny scraps following a pre-determined sequence. Following the sequence warrants a virtually perfect finishing - not following is just chaos. Impossible. Disregard the possibility. You'll never see the end of it.

It seems odd, but despite the need of a good dose of concentration, Foundation is delightful to make. My dear teacher says the tulip defines right away if the person is of the Foundation kind or not - can I say there are Foundation and non-Foundation people? Hmm. Already said it. Anyway, apparently lots of people give up right in the beginning. I LOVED it. So much that I've made the little house right after that - which I said it's a bird house (because the pattern says so), and my father insists it couldn't be more wrong. Bird houses have the entrance (the red part) ON THE BOTTOM. And that from someone who couldn't see what the cross stich designs I make are (the nativity scene was the first one he could actually understand!). Go figure.

These two "screens" still need a place to be hung on. My mom gave me something that might work - but it needs a little finishing before being put to use. I.e., put it on the list: they're WIPs.

Sunday, January 17, 2010

UFOs, WIPs and a week without posts

This week has been im-pos-si-ble. By the blog activity, you have probably thought I have given up, haven't you? Of course not!

Despite the madness at work, which forced me to work late all these days, I've managed to keep some things moving. Look how un-be-liev-a-ble!!!

1. I've made TWO - that's right, T-W-O! - knitting rows;
2. I've taken part of the sewing circle.

The two knitting rows - imagine that - were made in DIFFERENT DAYS. I think there's no need for me to explain how hard it was to make anything, right?

As for the sewing circle, I had planned everything with a few girls from work: I've done everything I could to persuade them to join (they were not excited at all), I said I'd bring the easiest projects in the world and even the materials. Ultimately, having lunch in half hour to save time and then working till late, I gave up persuading them. I've started my little sewing project in the right day, at 10 p.m.. I've stopped at 11, due to absolute fatigue. But I was happy while sewing, knowing I've kept my word with all other girls that joined the circle that day. Being part of something like that is good to the heart. :)

All that made me think about two things: UFOs and WIPs.

UFO means UnFinished project - even the anagram needed creativity to be invented, since, as you can see, it doesn't match the words! Anyway, it's something that, for what I read, see and... well, do, it's absolutely normal. If you do any kind of handmade art, you've certainly had at least one project you've started and not finished.

This doesn't mean you will never get back to your UFO. It might be that you didn't like your color choice, or that the project is hard to make, or simply lack of time. But the matter is that they seem to haunt us sometimes, especially if they ended up in the back of a closet and we suddenly face them when looking for something else. It might even make us feel guilty.

On the other hand, WIP stands for Work-In-Progress. Note that this anagram matches perfectly, what shows a very different energy, doesn't it? These are the projects that excite us, that we want to see finished, and that usually have an extra motivation - for instance, a gift we want to give. Remember the book sleeve? I've thought of making it right after buying the book to give as a present, but I've only actually started when my friend S. confirmed she was coming to visit.

Thinking about all that, I've come to the conclusion that I do have a good list of UFOs - but I'll do my best so they are not forgotten, and so they're actually WIPs! Despite the difficulties at work, small steps have been taken, and I guess that, in the end of the day, that's what matters. I always remember what Brye Lynn, from Sew ~ Stitch ~ Create, says in the end of all her podcasts: "Craft everyday and make something beautiful". That's what I try to do!

And to prove that this blog is a WIP and not a UFO, it's now in Technorati and BlogBlogs - the codes below are for their tools to identify the garden!


Technorati claim code: G4G5C49VCCMY

Code for BlogBlogs.Com.Br

Tuesday, January 5, 2010

Small projects, satisfaction garanteed

I like small projects. Big projects, like the Nativity scene, are really nice to make, sometimes they challenge us - whether it is to learn a new technique or due to some difficulty that only after surpassing it we'll come to the desired result.

Small projects, in turn, have other very attractive characteristics: besides being quick to make, they usually don't demand very advanced skills, and they bring the satisfaction of getting something done. Soon. "I can already wear it".


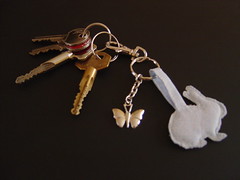
The keychain in the photo I've made last year. The project came from CraftStylish, and I took part in a draw from Superziper with it - of course, being a draw, it didn't matter the difficulty level. It was done in two hours, maximum. At the time, I still used to make my blanket stitches without going all the way to the border, but I've left this nonsense behind just a while ago, haven't I? ;-)

I always have many ongoing projects, and by the talks I have with other people that enjoy handmade and by the discussion lists, blogs and websites I follow, I know it's quite normal (for the despair of many husbands, I must say - men usually don't understand the need we have for varied materials and even different techniques for different days). Among these projects, there are no small projects - simply because they are so quick to finish that there's no time for them to get in line! They just start and finish!

When you start a more ambitious or detailed project, stop it sometimes to make a small project. The satisfaction of seeing it completed will surely give you incentive for another series of sessions with your other works in progress.

One last observation: the other keychain, that accompanied the rabbit I've made, has already broken long ago. Another proof that what's handmade is much better.

Sunday, January 3, 2010

Top 100 craft tutorials of 2009


Review what's passed is a good way to start the year, isn't it? The website The Long Thread seems to agree with this, because they've made a list of what they consider the top 100 tutorials of 2009. the links are gouped in categories, like bags, clothing and accessories, toys, home decor and a section for holidays like Christmas.

Check it out here - found Craft Daily.

This year, there are no excuses not to make pretty things.

Saturday, January 2, 2010

Tutorial: book sleeve

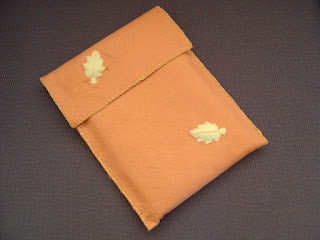
Today I teach you how to make a book sleeve!


Between you and me, it is so easy that almost didn't deserve a tutorial. Almost. As I told you before, I've made this little project real quick, to wrap a book I was going to give as a present. Because we don't like disposable things, do we? Not at all! So let's make the wrap:


Start by measuring the object concerned - in this case, a book. You'll only need a little margin, since we're making an envelope that needs a little deep.

Materials listing:
  • Felt with approximately 3 times the book height
  • Pieces of green felt, if you want to decorate with leaves, like I did
  • Filling, also for the leaves
  • Embroidery thread (I've used green for the borders and brown for the leaves)
Cut a rectangle with more or less 3 times the book height, and 2 cm more on the width. In case the book is too thick, add more to the width. An easy way to find the measures is to wrap the book with the felt, as if you were going to use it as gift wrap. Really quite intuitive.

Set the flap size as you prefer and... embroider the borders! Yes, simple like that! I've used blanket stitch, and I must confess it got better in the end - I wasn't going all the way out to close it, and that's exactly the way it looks best! I'm not sure you can see what I mean, maybe it's not even possible to see this detail (it doesn't matter, no one needs to notice the little flaws, right?).


For the leaves detail, I've drawn one on a piece of paper, free hand, and then put it on the felt to cut. I've made the detail on the center using backstitch, and the leaves contour with blanket stitch again - leaving an opening to add the filling before closing it:


That's it! Quick and simple, perfect to replace gift wrap, and it will for sure cause a bigger impact on whoever receives it, because it shows how much you care!

If you don't know how to make blanket and back stitches, there are lots of sources available: videos on Needle'nThread and graphics on Méri's illustrated glossary - which also helps in case you need to find videos and other sources in portuguese or another language. I highly recommend them both!

You can make variations of this idea in many forms: using another kind of fabric (only felt has the advantage of not shredding), make the details with other shapes (flowers, circles, anything), put some kind of closing, like buttons or even velcro, and, of course, wrap other things besides books.

In case you have any question, feel free to add questions in the comments section or send me an email. If you use this idea to make anything, don't forget to send me pictures!